28 June 2009

Launching Day!


A large crowd turned out for the launching of Bequia on Saturday.


After two and a half years
on the drawing table and then two years being constructed, the 90 foot yawl Beguia, the largest yacht that Brooklin Boat Yard has ever designed and built, was launched.


The champagne bottle cracked over the keel with a satisfying pop and a spectacular shower of foam.


Picking The Ninety
up off the keel blocking and starting to move her onto launching pier. The capacity of the travel lift is 175,000 lbs, well above Bequia's measured weight of 145,000 lbs., but the wheels were still squished plenty under the weight of such a large boat.


Bequia's bow towered over the crowd that surged forward as she moved onto the lauching pier. After The Ninety came out of the building shop a couple of weeks ago, one resident commented that most boats look smaller out of the shop, but not The Ninety.


Everyone watches eagerly as Bequia is slowly lowered into the water. For the designers and builders it isn't a question of whether she will float, but where. Will she sit down by the bow, down by the stern or just right? Will she have a list?


Bequia backs out of the launching pier under her own power. Once afloat we had to spend some time rearranging halliards holding the mast forward to clear the top support of the travel lift, then move the travel lift forward to set up the inner forestay. During this time several people asked if the motor was running. It's hard to tell. She's that quiet.


A flotilla of small boats watches Bequia pull away from the pier and start to turn around to motor towards the mouth of Center Harbor.


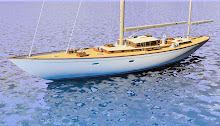
As Bequia turns we all get a broadside view that, until today, we had only really seen on the sheets of the construction drawings. And everyone is thrilled to see she is sitting almost perfectly on her waterline, just like the drawings.


The newly launched Bequia motors out of the harbor for a maiden voyage of a couple of miles in Eggemoggin Reach. Even at top speed it was easy to talk in the cockpit above the noise of the engine, showing us just how well all the efforts at sound deadening in nearly every part of the boat had paid off. We motored up the Reach towards the bridge for a short time, then Steve White put the helm hard over to show the beaming owner how manuverable his new yacht is. Bequia turned around in just a little over her own length.

After the short turn around The Reach, Bequia returned to the boat yard dock, with the help of a few successful bursts from the hydraulic bowthruster, and tied up for admiring tours and the rest of the day's and evening's celebration. In the coming weeks the sails will be bent on and the job of commissioning The Ninty will make her ready for the happy and eager owners to take delivery of her.

23 June 2009

Getting Ready to Come Out of the Shop


Cody and Mark install the variable pitch propeller on the shaft of the 90


For the last month we've been getting ready to pull Bequia out of the main building shop, finishing up projects, installing fittings and equipment that will be needed for the launching, testing as many systems as we can, varnishing and painting final coats (for now), painting the name and the hail on the stern and removing staging.


A sure sign of the boat getting close to launching is being careful that we don't do more damage than building. The sole guys are watching the rest of us with an eagle eye. Along with no shoes, we cannot wear belts with buckles. A few of us keep our pants up with buckle-less belts. The deck is vacuumed almost everyday to pick up accumulated grit. Anything that is sharp or heavy is swaddled or padded with thin foam, bubble wrap or rags.


Late on Friday, June 12th, a heavy-capacity boat trailer was trucked over from the Lyman Morse yard to pull Bequia out of the shop and set her up for stepping the masts and setting up the rigging.

08 April 2009

A Couple of Processes


Keith Claybough positions walnut veneers on an epoxy coated plywood panel in preparation for clamping down the veneers by vacuum bagging as he makes a counter top for the owner's cabin.


Here are a couple of processes, vacuum bagging and making floorboards, that have been ongoing throughout the interior of the boat all winter and into the spring. There is rarely a day that, when we go home, the sound of a vacuum pump or two isn't running somewhere in the shop. And everyday for months a small crew of two guys have been gluing, grinding, vacuum bagging, sanding, trimming, routing, finishing and fitting the nearly black panels of the wenge floorboards that run throughout the boat.

Vacuum Bagging


After Keith tacked the veneers in place, so they they wouldn't slide around as pressure was applied, he covered the panel with a piece of blue pool cover then a piece of light green vacuum bagging plastic that is sealed all the around the edges to 1/8" thick butyl tape that had been applied to the work surface--in this case a piece of flake board--before gluing started. Before completely sealing around the bagging plastic, Keith inserts the hose that runs to the vacuum pump.


Keith then completely the seals "the bag," adding butyl tape over the top of the hose, then turns the pump on and pulls the air out. As the plastic pulls down tight, Keith checks all around the edges of the bag and the hose for leaks.

With a good vacuum the pressure on the surface of the veneers is 14 pounds per square inch, which doesn't sound like much but on this roughly two foot by three foot panel there is a total of just over 12,000 pounds of pressure.

The next day he'll take off the bag, scrape and sand off any excess epoxy, then trim the edges of the panel in preparation for the final treatment of the exposed edges and fitting in the boat.

Gluing veneers onto panels not only allows us to dress up structural members like bulkheads, such as the teak panels in the captain's cabin, but also allows us to make parts like counter tops and floorboards that will stay much flatter than their solid wood equivilents in the damp environment of a boat

Floor Boards


Making the floor boards starts with jointing and edge gluing together thick venners of wenge wood into panels a little bigger than the finished floorboard. Each floor board needs two of these veneer panels. Here blocks and wedges clamp the pieces of wood together while the lead weights on top keep the thin panel flat. After gluing the panels will be ground smooth.


Next the structural part of the floorboard is made from a special plywood with a sound dampening foam core that looks like black cork. The plywood is cut smaller than the finished floorboard and a groove routed all around the edges. Here Jimmy Hutchison and Richard Washburn insert wenge strips that have beeen machined with a tongue to fit into the grooves. The solid wood is clamped to the plywood with the same blocks and wedges that were used on the veneers.

Next the floorboard sandwich is made. First there is a veneer panel put down on a sheet of bagging plastic and its top surface coated with epoxy. Then the plywood panel is put on top and coated with epoxy. The last layer is the second veneer panel on top of the plywood. Over the panel goes either the pool plastic or sheet plastic and a special fabric called breather cloth, then the hose from the vacuum pump and finally the bagging plastic, which is twice the size of the floorboard, is folded back over the floorboard panel, the edges sealed with butyl tape, andthe pump started up.

After the floorboard is cleaned up and sanded smooth it is marked for final size with the pattern made in the boat.


Here Jimmy trims the floorboard with a circular saw run along a straight edge to seperate the fixed part of the floorboard from the portion that will made to lift up for access into the bilge and the many hoses, wies and pipes below.


The floorboards are coated with urethane and labeled, then fitted in the boat, here in the passage between the main cabin and the aft cabin.


Finally, the floordoards are fitted with hardware such as hinges and hatch dogs.

23 March 2009

More mid-winter projects below


Bill Robbins applies a good looking build coat to the paint work in the forward stateroom.

In late January and early February, the forward stateroom and the aft cabin, as well as the passageway between cabins, are largely built and the painters can take over from the carpenters to build a good base of Simple White paint in preparation for the final coats of several hues of white for the trim, framed panels, and beaded paneling. This process requires lots of sanding, good brushes, good light, good concentration--and good tunes.


The major construction work has moved to the pilot house. Here David Fresh, the Composites Manager, sheaths plywood panels with fiberglass in epoxy for partitions in the pilot house.


These partitions are then installed around the air conditioner/heater and air handling hoses at the aft end of the pilot house, including large hoses for piping fresh air to the the machinery room. The partions also form a pocket for the sliding companionway door between the cockpit to the left and the pilot house itself on the right.


Another project below is trimming out the door ways between various cabins. Here Doug Haldane is sanding a wenge threshold that matches the wenge sole throughout the interior of the boat.


After installling the threshold in each doorway, Doug trims and installls the door jambs that are built up of several pieces of molding machined out of spanish cedar that will then be primed and painted to match the rest of the woodwork throughout the boat, except for the captain's cabin which is trimmed out in teak.


The major project in the captain's cabin is finishing out the head. Here Claus Batley glues up the curved frame for the basin cabinet front, a tricky clamping job.

19 March 2009

Mid winter work on the Interior


Chris Muise, one of the drawer guys, caught in the act of installing a drawer front.

One thing that is prized during a Maine winter is a job indoors. In the old days that likely meant a building that was only a few degrees above the outside temperature, but at least you were out of the biting wind. These days, with modern adhesives, it means being able to wear a tee shirt all year long, as Chris is elegantly modeling here.

Here's interior wood work that we did in the main salon area through the end of January.


There are two ways to get below, one through a sliding hatch on the aft end of the aft cabin, into the owner's cabin, and the main one here, through the pilot house into the salon. The pilot house will be mainly finished out in varnished teak. The white panel is the bottom of the chart table that also forms the left side of curved stair well.


At the base of the main stairs you can turn left to go into the galley and captain's cabin. This is a partition between the galley and salon that has a core of plywood that will be sheathed over with beaded board paneling. Here the curved corner is being coopered with strips the same width as the beaded boards. The sharp corners will be planed and sanded off until a smooth radius is formed, then the strips will be removed and a bead routed along the edge of each one. The partition butts into the aluminium cage that surrounds the main mast, on the right.


In the galley the masons from Fresh Water Stone fitted and installed the marble counter tops.


In the main salon the last of the trim over the joint between the cabin sides and the deck carlins has been installed and is ready for paint.


Al Strong puts a coat of sealer/primer on the panels that were built to house the hydraulic motor for one of the two halliard winches. The winches are mounted on the cabin top on either side of the main mast (note the mast cage to Al's right) and the motors stick down into the salon.


Here stiles and rails are glued on the panels that are to go on the main mast cage.


The first panels, with molding installed around the inside edges of the stiles and rails, is fitted and fastened onto the mast cage.


Trent Glisson (who also made the mast cage panels) installing the first pieces of molding that will go around the edges of the large curved opening in the main bulkhead (located just aft of the main mast). Trent is also going for the modern boat builder tee look.

13 February 2009

Cold Outside, Busy Inside: On Deck


Joseph Larson installs hawse pipes through the bulwarks near the stern.


There was no January thaw this year and plenty of snow, sometimes mixed with freezing rain, so there were a number of days when it was tough getting to the boatyard. But we got plenty done despite the weather.


The forward corner posts on the pilot house have been fitted and glued in, followed shortly, here, by the forward section of the cabin edge pillowed trim being fitted and glued on.

Note the aluminium cabin top beam resting on the top edge of the pilot house. This beam will be marked for length and legs welded on for attaching to the inside of the pilot house sides. There are two of these beams in the pilot house.


Holding the pillowed trim on while the epoxy sets called for putting clamps wherever there was hole in the cabin top and sides.


Shaping the pillowed trim was started by cutting a bevel along the whole length of the trim with power planes, then using using hand planes to shape the teak very close to the final profile, then finishing up with a succession of course to fine sandpapers to make the trim fair and smooth. Here Reed Hayden gives the trim a final sanding.


The painters meticously went over the pilot house sides with fine grit sandpaper, then applied a coat of sealer.


The portions of the deck panels that were cut for the hatches are fitted onto the hatch covers, with holes carefully cut for handles and hinges, and the gap between the deck and the hatch panel evened up. The hatches were then taken off the boat and the deck panels glued on. This is the propane locker hatch on the stern deck.


Gluing in the margin planks around the stern. These required 12" wide stock, but the only teak that was wide enough was over 2" thick. It was resawed to make a book matched set of three pieces around the elliptical stern.


After all the seams between the deck panels and around the margin planks were caulked and dried for a couple of days, Keith Dibble grinds the deck smooth.


Larry Wood checks the fit of the stainless steel coverplates over the starboard main mast chain plates.


Todd Skoog checks the fit of the aluminium cabin top beams and sees if they match the camber pattern.


Reed (left) and Norman Whyte start fitting long opening skylights along the side of the main cabin below the pilot house. This skylight is located over the galley, and is a feature that will be deeply appreciated by anyone making a meal, especially in tropical climates.


After sanding the sealer coat, Robert Freethey applies the first coat of varnish (of many) to the pilot house sides.

30 January 2009

Back After Christamas Part 3


Ronnie Billings, the head electrian at the yard and the foreman for all the systems in The Ninety, hooks up wires in the junction compartment on the side of the passageway leading from the main cabin to the aft cabin.

Systems

When asked a year ago what he thought the most challenging part of The Ninety would be, Steve White replied simply, "The systems." In such a big boat, there's lots of them and they all have to work together: electrical, hydraulics, plumbing, water maker, heaters, air conditioning, lights, electronics, engine and genrators, propane to the stove and fireplace, refrigeration, the steering system, the bow thruster and anchoring systems. Most of the sailing functions are operated by hydraulics so only a few people can sail her. That all leads to miles of hoses, piping, and wires.

Here's a snap shot of what the electricians and mechanics were working on in early January.


There are two electrical control panels in the boat. the main one (top photo) is convienantly located at the base of the stairs leading down from the pilot house. The second panel (not yet installed in the lower photo) is in the captain's cabin.


Both panels back up to the machinery space so inside the space are large bundles of wires running from the panels to the junction space, where Ronnie was shown working, then onto thier destinations for the many switches, lights and motors.


The wires running from the machinery space mainly run the length of the boat in 4" square fiberglass conduits recessed into the 3" thick cored deck and into the deck beams. There are two of these conduits on each side of the boat. Many oval holes were cut in the bottom of the conduits to allow wires to be pulled out and run along beams or in cabinets to the devices they are energizing.


This week the pumps, controls and secondary filters for the water maker system were installed in the lazerette. The rudder is to the right. This is only half of this part of the system. On the other side of the boat (starboard) is an identical set.


The inlet and main filters for the water maker system were installed in the machinery space about the same time the engine was installed, months ago. Altogether the water maker system can make 1800 gallons of fresh water in 24 hours.